Why I bake- a lot

As an alcoholic in recovery, I had to find another outlet, another addiction if you will. I bake because it not only makes me happy to have created something, but it is always SO FULFILLING to give what I bake to other people, and make them happy. So none of the recipes on here include alcohol, and if I do make a recipe that calls for wine, I will substitute fruit juice.

And I am a big kid. I want to be a French teacher for pre-schoolers, so I feel it is important for me to keep thinking like a child. Also the whole child-like thinking helps me feel fulfilled in my daily life. Please leave comments if these recipes make you happy, I just love hearing that. I strive to keep the child inside me alive.

Sunday, April 1, 2012

Cake Batter Pancakes!

It's my BIRTHDAYZZZZZZ! By the addition of the z, I mean it is my sober birthday April 1, and my belly-button birthday April 2. Belly-button birthday is the actual day that I graced this world with my presence, 24 years ago. So I started writing this post on the 1st, and I will end it on the 2nd, so yah, BIRTHDAYZZZZZZ. This morning I decided to make myself a special breakfast to celebrate my 2 years of sobriety. If you remember, I made Cake Batter pudding cookies a few weeks ago. These are along the same same lines, but they are PANCAKES with SPRINKLES and instead of syrup you serve them with ICING. Just sounds all over amazing right? Yep, exactly what I thought!
Looks yummy!

So as I said, the 2 candle is for my sobriety birthday. I also have a 4 candle to add to it with whatever fun stuff I choose to make myself tomorrow. YIPEE! I got this recipe from www.chef-in-training.com, same as the cake batter pudding cookies.

You'll Need:

For Pancakes:
  • 1 1/2 cups all purpose flour
  • 2/3 cup yellow cake mix
  • 1 tablespoon sugar
  • 3/4 teaspoon baking powder
  • pinch of salt
  • 2 eggs
  • 1 teaspoon vanilla extract
  • 1-2 cups milk
  • assorted sprinkles
  For Glaze:
  • 1 cup powdered sugar
  • 1/2 tablespoon milk
  • 1/2 teaspoon vanilla extract
  • assorted sprinkles
You'll Do:

For Pancakes:
Combine flour, cake mix, baking powder, sugar and salt in a bowl and mix. Add 1 cup of milk, egg and vanilla extract and stir until smooth. You want the batter to look like regular pancake batter; not too thin, not too thick. This will vary greatly on the brand of cake mix you use. Start with 1 cup of milk and add more if needed.  *You may need to have small taste test to see if the pancakes are flavored enough, if not, add a little more yellow cake mix until desired flavor is reached**

Preheat a skillet on medium heat (or an electric grilled and turn it to 250 degrees). Fold desired amount of sprinkles into batter. Pour batter in 1/4 cup measurements onto skillet and let cook until bubbles form on top, about 2-3 minutes. Flip and cook for 1 minute more. Serve with vanilla glaze.

For Glaze:
Mix milk, extract and powdered sugar until glaze forms. You may need to add a little more sugar or water/milk to reach desired consistency. I needed to add more milk.  Mix into glaze and drizzle on pancakes.

YAY! Happy....pancake making??

Cookies of the Week 12 and 13

Week 12: Peanut Butter Cup Brownie Drops!

Warning: Don't Judge this cookie by it's picture:


I had some trouble focusing because of the different textures. grrrrrr. This cookie was really gooey and fell apart when people took them out of the cookie jar, which just means pure peanut butter chocolate awesomeness. My recommendations is that you pawn off unwrapping and chopping up the mini Reese's, that was the worst. The rest of the recipe is quite simple, Made from a saucepan. I got this recipe from www.hersheys.com.

You'll need:

  • 38 to 40 REESE'S Peanut Butter Cups Miniatures
  • 3/4 cup (1-1/2 sticks) butter or margarine
  • 1-1/2 cups sugar
  • 3/4 cup HERSHEY'S Cocoa
  • 2 eggs
  • 2 teaspoons vanilla extract
  • 1 cup all-purpose flour
  • 1/2 teaspoon salt
  • 1/4 teaspoon baking soda
You'll do:
  1. Heat oven to 350°F. Lightly grease cookie sheet or line with parchment paper. Remove wrappers from peanut butter cups. Cut each peanut butter cup into 4 pieces; set aside.
  2. Melt butter in medium saucepan over low heat. Add sugar and cocoa; stir to blend. Remove from heat; stir in eggs and vanilla. Stir together flour, salt and baking soda; stir into chocolate mixture. Stir in peanut butter cup pieces.*
  3. Drop by heaping teaspoons onto prepared cookie sheets. Bake 10 to 12 minutes or until set and edges are firm. Do not overbake. Cool slightly; remove from cookie sheet to wire rack. Cool completely.
    About 4 dozen cookies.

    * For more visible peanut butter cup pieces, some of the pieces can be held back and then pushed into the cookies just as they come out of the oven. 

Week 13: S'mores cookies!

Who in their right mind doesn't like s'mores?! I mean really. Quoting The Sandlot is enough reason to love this campfire treat. So I found this awesome recipe for a S'mores cookie and of course I had to try it out!


Looks pretty amazing right? Yah, I know. So I found this recipe on www.kevinandamanda.com. These cookies have certainly gotten more rave reviews from my variety of taste testers than any other before. And I agree completely!

You'll Need:
1/2 cup (1 stick) butter, softened
1/2 cup sugar
1/4 cup brown sugar
1 egg
1 teaspoon vanilla
1 1/3 cups flour
3/4 cup graham cracker crumbs (7 full graham cracker sheets)
1 teaspoon baking powder
1/2 teaspoon salt
1 cup Mini Hershey’s Kisses (or chocolate chips/chunks)
1 cup Jet Puffed Mallow Bits


You'll do:
Preheat oven to 350 degrees F. Line a cookie sheet with parchment paper and spray with cooking spray. Using a mixer, cream the butter and sugars until light and fluffy, about 3 minutes. Add the egg and vanilla and beat for an additional 2 minutes.

Meanwhile, use a food processor or blender to crush 7 graham cracker sheets into 3/4 cup fine crumbs. In a separate bowl, whisk together the graham cracker crumbs, flour, baking powder, and salt. Slowly add the dry ingredients to the wet ingredients, and mix on low speed until the dough just comes together. Add the chocolate and marshmallows and stir to combine.

Place 1.5 tablespoon sized scoops of dough onto the prepared cookie sheet. Bake at 350 for 10-12 minutes.

My tips: Get the Marshmallow Bits! I made to batches of these cookies, the first one (in the picture) used regular mini marshmallows. The marshmallows puffed up and melted on the cookie sheet and it was nearly impossible to get all of the cookies off the sheet with out messing them up. The second batch (I went to Target to hunt for the bits, my local grocery store didn't have them) used the mallow bits and it was TONS easier and the cookies came out prettier also.


Happy Baking!

Wednesday, March 14, 2012

Cookie of the Week 11

I'M A BAKING LEPRECHAUN! lol not really. There is no pot of gold at the end of this post (DAGNABBIT) But for St. Patrick's day, I decided to go green with the cookie of the week! My friend Carrie made these cookies a while back, and they were so good I just had to add them to the cookie of the week list. AND THEY ARE GREEEEEEEEEEEN. Perfect.

Mint Chocolate Chip cookies. They actually taste like the ice cream, but not, you know, cold. It was a weird taste first bite and then reality sets in and you just want to keep eating them!

They look so pretty all packed up in the cookie jar that I just had to take a picture of them. This recipe comes from thestir.cafemom.com

You'll Need:
2 3/4 cups all-purpose flour
1 teaspoon baking soda
1/2 teaspoon baking powder
1 cup butter, softened
1 1/2 cups white sugar
1 egg
1 teaspoon vanilla extract
1/2 teaspoon mint extract
8-10 drops of green food coloring (optional)
1/2 cup creme de menthe baking chips 
1/2 cup semisweet chocolate chunks

You'll do:
Preheat oven to 375 degrees F.
Mix together flour, baking soda, and baking powder.
In a large bowl, cream together the butter and sugar until smooth.
Beat in egg, mint, food coloring, and vanilla. Gradually blend in the dry ingredients.
Add the baking chips and chocolate chunks. 
Roll dough into balls, and place onto ungreased cookie sheets.
Bake 8 to 10 minutes in the preheated oven, or until golden. Let cool.

Some tips from yours truly: My grocery store did not have creme de menthe chips, but they did have a dark chocolate/ mint chip mix from Toll House. I used a cup of these and just omitted the other chocolate chunks. Worked out fine. I did add slightly more food coloring than the recipe calls for, and that also turned out fine. I wanted them suckers GREEN. And finally, don't be led astray by the ungreased cookie sheet. I thought it was weird when I first read it, but there is soooo much butter that these things just lift right off the pan. I was planning on a cleaning struggle, but it did not come to that thankfully.

That's week 11!!!! Can you guys believe its the 11th week ALREADY? Its true, time does fly as you get older.

Happy Baking!

Monday, March 12, 2012

Cookie of the Week 10

Cinnamon bun COOKIES

Yum Yum Yum! Not the best I've made yet, but pretty damn good! I got behind on the cookie of the week deal this month because I first realized that I had miscounted weeks and had too many cookies vs. weeks AND THEN I was a part of a planning committee for a conference that was this past weekend, SO I was pretty engulfed in that all last week. So I made cookies tonight and I plan on making week 11 later this week. It will be festive for St. Patty's day! YAY! Is it weird that even as an active alcoholic I never really participated in St. Patrick's Day except for a few pinches, usually directed toward the male of the moment, as a way of flirting. Yah, I certainly have that whole male problem in my life too. ANYWHO, back to cookies! These are another roll up cookie, similar to the Chocolate-Swirled Peanut Butter Cookies of Week 2.
 The Icing makes them glorious looking. I got this recipe from Once upon a Plate.

You'll Need:
2 cups all-purpose flour, plus additional 2 tablespoons flour
1 teaspoon ground cinnamon, plus 1 tablespoon ground cinnamon (divided use)
1/2 teaspoon baking soday
1/2 cup butter, soft room temperature, plus 3 tablespoons (divided use)
1/2 teaspoon salt
1/4 cup granulated sugar
1/4 cup brown sugar, plus 1/2 cup (divided use)
1 egg yolk
1/4 u applesauce
1 tablespoon light corn syrup
1 teaspoon vanilla
For the glaze:
1/2 cup confectioner's sugar (sifted)
1 to 3 tablespoons milk

You'll do:
In a medium bowl thoroughly whisk flour, salt, baking soda and cinnamon until ingredients are evenly blended and no lumps are present.
In the bowl of a stand mixer fitted with paddle attachment,  beat 1/2 cup butter, 1/4 cup granulated sugar, 1/4 cup brown sugar until light colored. To the mixture add egg yolk, applesauce, corn syrup & vanilla. Beat until well incorporated.  Remove paddle and bowl from mixer. With a wooden spoon or stiff spatula fold flour mixture into butter mixture until just combined. Divide dough into two equal pieces, wrap in cling film; refrigerate for 30 minutes to an hour. While dough is chilling combine 1 tablespoon cinnamon & 1/2 cup brown sugar in a bowl; whisk to mix evenly. Set aside.
When dough has chilled, roll out into a rectangle 1/4-inch thick. The dough is sticky, so I like to either roll between two silpat/silicone baking mats, or waxed paper which has been sprayed with a little oil spray (like Pam). Place one oiled wax paper facing up, place the dough, then top with another sheet of wax paper (oil side down), then begin rolling. With a pastry brush, spread 1 1/2 tablespoons of soften butter on dough; sprinkle 1/2 of the cinnamon & sugar mixture evenly over the butter; gently pat into the dough.  Form log by rolling log from the long side, roll firmly and place seam side down on parchment paper or plastic cling film; wrap air-tight.  Repeat entire process with second half of dough. Place both wrapped logs in the refrigerator and chill for 45 minutes to an hour.
When chilled, remove from refrigerator and slice each log into 1/2 inch slices, place slices on parchment lined, or baking mat lined baking sheets, leaving about 1" between each slice on all sides.  Bake in a 350˚ (F) oven for about 8 to 10 minutes until lightly browned.  Remove from oven, allow to cool on baking sheet for 2 to 3 minutes, then place each cookie on a wire rack to cool.
Make Glaze:
Sift powdered sugar place in a small bowl;  drizzle in milk until desired glaze consistency is reached.  Drizzle tops of cookies with glaze. Glaze will dry completely, store cookies in an airtight container.

A few notes from my experience: I had no idea what the "u" was for the applesauce. I just used a whole one of those single serving applesauce cups. Be sure that when you roll your log, you roll tightly. This will #1 make it easier to cut the cookies and #2 they won't semi-fall apart in the oven.

The recipe on the blog says it makes two dozen two inch cookies. One batch of mine came out as one inch and I made about 20 cookies. As with all recipes, I guess it just varies.

Happy Baking! 

Tuesday, March 6, 2012

Happy 100th Birthday Oreo!

It's a birthday celebration of the most awesome little snack cookie EVER. If anyone wants to argue that point, go ahead, hit me with your best shot. Oreos are so awesome because you can eat them several different ways, like dunking, licking the creme first and just munching down on the cookie, or just eating it the regular way. AND because you can bake them into some pretty awesome things. Wrap chocolate chip cookie dough around them and bake them for an Oreo inside a cookie. Put them in cupcakes, smash them up into ice cream for cookies and creme ice cream, Use the crumbles to coat a cheesecake cookie for a wonderment for the mouth, or combine a bunch of stuff and make Cookies 'n' Cream Oreo Fudge Brownies, which is what I did to day to celebrate.

Let me say that again: COOKIES 'N' CREAM OREO FUDGE BROWNIES

Maybe a picture will help you salivate over this a little more:

Yep. I did gooooooood. These brownies are not only fudgy, melt in your mouth awesomeness, but they also have that great cream taste that can come from the one and only O-REEEEEEEEEE-O. yum yum yum yum. Got this recipe from www.kevinandamanda.com. So happy with these! If you want a prettier picture, go to their site. I had a little trouble getting the brownies out of the pan all nice and neat because they were THAT gooey.

You'll need:
1 box Brownie Mix
eggs & oil (as called for by the brownie mix)
1 heaping half cup (6 oz) Cookies & Cream ice cream
1/4 Cup hot fudge topping (chilled or room temp)

You'll do:
Preheat oven & spray an 8×8 baking dish generously with cooking spray. Combine brownie mix, eggs, and oil as directed on the back of the box, but do not add the water. Add ice cream and hot fudge to the brownie batter and stir to combine. Pour half of the brownie batter into the baking dish, layer with Oreos, then top with remaining batter. Bake for 40-50 minutes or as directed on the back of the box.

I actually put some crumbled Oreos on top, ya know, just for good measure. I will say once agian, these rock.

Happy Baking!

Monday, March 5, 2012

Step Three: Made a decision to turn my life over to the joy of baking. And Chess Squares!

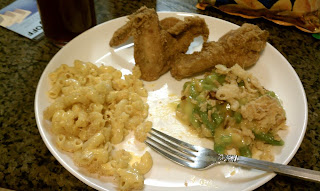
Seriously, I'm on a baking kick. It's Spring Break for me this week, so I decided tonight I was gonna make myself a nice southern meal. Fried chicken, Green Bean Casserole and Macaroni and Cheese.
Granted, I got some help along the way. Kroger Fried chicken and I made the Kraft homestyle Mac & Cheese. But I did make the Green Bean Casserole! (Or as my friend Ian likes to call it, Greenbough casserole) I make it a touch different than most people so here's the recipe for that:

You'll Need:
2 large cans of green beans, drained
2 cans of cream of cheddar soup
1 large can of fried onions

You'll do:
Preheat the oven to 325. Mix the DRAINED green beans, soup and half of the onions in a large mixing bowl. Transfer mixture to a prepared casserole dish, cover with other half of fried onions. Bake for about 20-25 minutes.

You can add salt and pepper to taste, or you can add milk, but I find if you use the cheddar cheese soup it turns out fine without anything extra. And yes, there is a story about why i mentioned draining the green beans twice. You see, this used to be the only thing I was comfortable with making for a long time, mainly because i was drunk and there is no expertise that goes into making this. So consequently, I made this drunk quite often. It is great hangover food. One time, however, I forgot to drain the beans. And it ended badly. Like a car wreck. To tell you the truth, it didn't just happen once, because usually I got into my cooking mode during blackouts (I know, I know, not the safest thing to do). So it was often that I opened the refrigerator the next morning to a soggy mess. What a waste of fried onions and soup. My advice is this: DON'T FORGET TO DRAIN THE BEANS!!!!

So now onto more important stuff, like dessert.

In keeping with my southern meal theme, I was craving a chess pie. If you have never had chess pie, it is basically eggs, butter, and sugar. Nothing wrong there. I highly recommend it. The problem with making a chess pie though is that it is hard to get the consistency right. I've tried multiple times and have ended up with a pie that was perfect until you got to about 2 inches from the center, and it wasn't baked at all. So for my dessert tonight, I decided to make chess squares. They are basically the same idea as chess pie, just baked more like a cake and pumped up a little bit. I have heard these things referred to as chess pie on steroids, and I must say, this is pretty accurate. Melt in your mouth goodness right here. I found this recipe on http://girloutofdixie.wordpress.com and I must say, I absolutely adore this blog. I love how I can relate to EVERYTHING on there. My favorite post is the one about pigs in a blanket, and the make-believe argument about how many crescent rolls to buy in the grocery store. I'm proud to say I have had that exact same argument. I take the stance that you can never have too many cans of crescent rolls lying around. They are so damn versatile. My favorite thing is wrapping sloppy joe mix and ground beef inside them and covering them with cheddar cheese before you bake them. Add 1-2 minutes on the bake time if you fill them. But alas, I digress. We are talking about chess squares. So this is what you get coming out of the oven:


It is just so beautiful that I had to take a picture. And it smells amazing. And the smell lingers. There is just so many wins to making this its unbelievable. And for my favorite food picture I have taken yet:


BEAUTIFUL, RIGHT? I know, I'm a baking rockstar. I'm kinda a big deal. So everyone that usually eats the stuff I bake that tried these agreed that this was my best creation yet. I know, ya'll are getting tired of reading it, but these are the best things yet. YUMMY YUMMY GET IN MY TUMMY!

You'll need:

For the crust:
1 egg
1 box yellow cake mix
1 t vanilla
1 stick butter, melted and cooled

For the filling:
8 oz. Cream cheese
3 eggs
1 box confectioner’s sugar

You'll do:

For the crust:
Mix above until crumbly. Spread in a buttered (or Crisco-ed, if you must) 9 x 13” pan. Work from the center and have the crust a little higher around the edges.

For the filling:
Beat well and pour into crust. Bake at 375 for 30 to 40 minutes or until brown.

I'm gonna have to make another batch of these soon. Happy baking ya'll!!!


Tuesday, February 28, 2012

Thin Mint Pie

Well this is a first! I am actually writing the post right after I made the goody! So, a long time ago, I was a girl scout. Actually, not that long a go. I was a brownie girl scout when I was younger, decided I did not like anyone in my troop, quit, changed schools, found out my new group of friends were girl scouts, and joined them as Cadette girl scouts and then senior girl scouts! I wasn't allowed to actually get my gold award, because I turned 19 before the project was done, but I helped! Anyways, I digress. The best thing about the Girl Scouts was that magical time in February and March when we sold cookies. Thin Mints are my absolute favorite. My mother's freezer is usually stocked (or was when I lived at home) with little green boxes of minty chocolatey joy. It was awesome. So when I found a recipe for thin mint pie, I was not going to pass it up! Booth sales usually go through the middle of March, so I am posting this in hope that you, the reader, will go get you some! And also, because this pie is just heavenly. Sinful. Delectable. Sent from a Supreme Being to this world of petty humans. No, but really, it's good.


I got this recipe from www.mybakingaddiction.com. She has prettier pictures on her recipe, but in my humble opinion, it don't matter what it looks like, it matters what it tastes like. MMMMMM. I just ate a piece and I can still taste it. It's yummy.

You'll need:
45 Thin Mint Cookies, divided use
1/4 cup (1/2 stick) butter, melted
1 pkg. (8 oz.) cream cheese, room temperature
1/3 cup sugar
8 ounces thawed Cool Whip Topping

You'll do:

1. Place 24 Thin Mints into the bowl of a food processor and pulse until the cookies have been crushed into fine crumbs; mix with butter until well blended.
2. Press firmly onto bottom and up sides of 9-inch pie plate. Refrigerate crust while preparing filling.
3. Coursely chop the remaining (21) cookies; set aside. Beat cream cheese and sugar in medium bowl with electric mixer on medium speed until light and fluffy. Add chopped cookies and whipped topping; folding gently until well blended. Spoon into prepared crust.
4. Refrigerate at least 2 hours or until firm. Garnish with whipped topping and additional cookie crumbs.

So some notes:
- Pie will store covered in the refrigerator for up to two days.
- If you don't have access to Thin Mints, Mint or Plain Oreos can be substituted or Keebler makes their own version, called Grasshoppers.
- Recipe adapted from Kraft.

GO FIND THOSE BOOTH SALES! Support your local Girl Scouts! And just pray that I don't sneak down to my refrigerator and eat the whole pie tonight. I'm seriously considering it.


Sunday, February 26, 2012

Cookie of the week 9!

Cake Batter.......Pudding........COOKIES

Like the best I have made yet. I know I say that about every cookie, but this one seriously trumps them all. When i first heard about putting pudding in a cookies I was like, "What?!" It sounded very weird and I was not sure what to expect. And it turned out to be the softest pillow of cake batter goodness ever. I have a thing for things flavored like cake batter. O, and just cake batter by itself. One of my mom's favorite stories of her growing up is that when she got her first apartment, she made a pound cake, and ate all the batter!!! It never got baked! I guess the apple doesn't fall far from the tree there. So even though these went just about as fast as the red velvet cookies, I actually got a picture of these.
Yep they just look like happy little bursts of sprinkles! YAY!!!!!! So I got this recipe from www.chef-in-training.com. Have fun!

You'll need:
  • 1 1/2 sticks (or 3/4 cup) butter
  • 3/4 cup brown sugar
  • 1/4 cup sugar
  • 1 (3.4 oz) package instant vanilla pudding mix, dry
  • 3/4 cup yellow cake mix, dry
  • 2 eggs
  • 1 tsp vanilla
  • 1 tsp baking soda
  • 2-1/4 cups flour
  • 1/2 tsp salt
  • sprinkles
You'll do:

Preheat oven to 350 F.
Stir together flour, salt and baking soda and set aside.
In a large bowl, cream butter and sugars together.
Add in pudding package and cake mix and beat until well blended.
Add eggs and vanilla and mix until smooth.
Add flour mixture slowly until well incorporated.
Mix in sprinkles sprinkles.
Roll into 1" balls and place on greased baking sheet.
Bake at 350 F for 10-12 minutes.
This makes about 3 dozen cookies. YAY! Good thing too, because it kept me from running out right when they came out of the oven!
Happy Baking ya'll!!


Tuesday, February 21, 2012

Cookie of the Week 8

Happy Valentine's Day! In honor of this holiday that lands on week 8, I made Chewy Red Velvet Cookies. Unfortunately, they disappeared so fast that I couldn't get a picture of them. But it's red velvet, in cookie form. Pretty self explanatory picture. I love Red Velvet, and I really wanted to find a recipe for chewy cookies. Mission Accomplished!
This recipe is from www.howsweeteats.com

Chewy Red Velvet Chocolate Chip Cookies
What You'll need:
1/2 cup butter
1/2 cup sugar
1/2 cup brown sugar
1 egg
1 teaspoon vanilla
1 1/2 cups all purpose flour
1 teaspoon baking soda
1/4 teaspoon salt
1/3 cup cocoa powder
1 teaspoon red food coloring
1/2 cup chocolate chips

What You'll do:
Preheat oven to 375.
Cream butter and sugars together until fluffy in the bowl of an electric mixer. Add egg and vanilla and combine until smooth. Beat in red food coloring. Stir in cocoa, flour, baking soda and salt until just combined, scraping down the sides when needed. Fold in chocolate chips.
Using an ice cream scoop, scoop out 1-2 tablespoons of dough and set on baking sheet. Bake for 10-12 minutes.

If you are really sore over the no-pictures thing, visit the original website. I would have copied and pasted them on here, but I have a fear of SOPA.

Monday, February 13, 2012

Cookies of the Week 6 & 7

Another great two weeks of baking! Both of these recipes I have made multiple times throughout their respective weeks. I think that as people start expecting them on certain days, they disappear faster. I got many compliments on these, and that just makes me want to keep making more. More praise comes my way then, and my ego loves it. I have a disease of more. Anyways, here are the recipes:

Week 6: Salted Mocha Chocolate Chip

I found this recipe and I was instantly hit with an Oh My God. I loooooove my coffee. Caffeine is good. Caffeine is my friend. So I was a little disappointed when these didn't come out with a potent coffee taste, but what I did get was a really gooey chewy chocolate chip cookie. And they were gone pretty fast. My brother's 5th birthday was this week, and his favorite candy is M&M's, so I used the batter from this recipe and just used M&M's instead of chocolate chips. There's some kind of unexplained taste to M&M's when they are baked. And it is great.

I got this recipe here: http://blogs.babble.com/family-kitchen/    It makes 36 cookies

You'll need:
16 tablespoons unsalted butter, softened
1/2 cup sugar
1 1/2 cups dark brown sugar, packed
2 room temperature eggs
2 teaspoons vanilla extract
2 3/4 cups unbleached all-purpose flour
1 teaspoon kosher or seas salt, plus more for finishing
1 teaspoon baking soda
1 1/2 teaspoons baking powder
1 3/4 cups semi-sweet chocolate chips
1 teaspoon finely ground coffee beans

You'll do:

Preheat the oven to 365 degrees. Line two baking sheets with parchment paper.
In a medium bowl, combine the flour, salt, baking soda, and powder.
In a large bowl, or the bowl of a stand mixer fitted with a paddle attachment, beat the butter on low speed for 3 minutes. Slowly add the sugar and beat for 3 minutes more, until ingredients are light, creamy, and well-combined. Next, add the eggs and vanilla. With mixer on low, slowly fold in the flour mixing just until combined. Finally, fold in the chips, making sure they are well-dispersed throughout the dough.
Scoop the dough in 2″ balls onto the prepared cookie sheets. Sprinkle each cookie with a small pinch of kosher salt.
Bake for 12 – 13 minutes, until the edges have just started to turn golden, and the centers are still soft. Cool on baking sheet for 3 minutes, and then remove to a rack to cool. When completely cool move to an airtight container and store at room temperature for several days.

Week 7: Oreo Cheesecakes cookies

Ummmmm these are AMAZING, and amazingly easy. So these are now my go to cookie when I want something fast. And there are no eggs, so the dough is ready to eat right when you mix it. And I couldn't help myself. One of the formed cookies dropped off the pan while i was putting them in the oven, so I held to the 5 second rule and definitely ate that sucker. NOM NOM NOM NOM. Seriously though, make these cookies. I got this recipe from www.browneyedbaker.com. It makes about a dozen and a half.

What You'll need:
½ cup unsalted butter, at room temperature
3 ounces cream cheese, at room temperature
1 cup granulated sugar
1 teaspoon vanilla extract
1 cup all-purpose flour
½ cup mini chocolate chips
1 cup Oreo cookie crumbs

What You'll do:
1. Preheat oven to 375 degrees F. Line a baking sheet with parchment paper and set aside.
2. In a mixing bowl, cream together the butter and cream cheese on medium speed until smooth and well-combined.
3. Add the sugar and vanilla extract and mix until the ingredients are well-combined. Add the flour and mix on low until the flour is incorporated. Stir in the mini chocolate chips with a rubber spatula.
4. Place the Oreo cookie crumbs in a small bowl. Scoop the cookies into about 1½ to 2″ balls and then roll in the cookie crumbs. Place the cookie balls on the baking sheet. Bake for 12 to 15 minutes, or until the edges are golden and the tops are slightly puffed.
5. Cool on the pan for 2 minutes before transferring to a wire rack to cool completely. Store in an airtight container.

Stay tuned for a special Valentine's cookie of the week! Happy Baking!


Tuesday, January 31, 2012

Sick Day Comfort Food

I'm not feeling well today. AT ALL. No energy is left in my body for any other activity but laying in bed. But I did pry myself up for a few minutes for my favorite comfort food: Chicken n dumplins. Now personally, I like my chicken n dumplins thick and creamy, and so I came up with a recipe that is SO SIMPLE and SO GOOD that I kinda just wanted to cry when I tasted it. It was exactly how I wanted it.


What You'll need:
4 boneless chicken breasts
12 refrigerated biscuits
2 cans Campbell's Cream of Chicken Soup
Pepper, to taste
Seasoned Salt, to taste

What you'll do:
Preheat the oven to 350
Bring a pot of water to a boil.
Throw the chicken in the water
Let them cook for 45 minutes to an hour, or until they are almost completely cooked. When they are finished, pour out most of the water, leaving about a 1/4th of a cup still in the pot.
Pour in the soup and simmer the soup and the chicken together for another 10 minutes, and then use a whisk to mash up chicken into small shredded bites. By this point it will be soft enough to do so.
Add the salt and the pepper to your own taste preferences
Pour mixture into a prepared casserole dish
Place refrigerated biscuits on top of mixture, pushing down on them so that they are halfway submerged in the soup
Bake in the oven using the directions for the biscuits. It may even take a little bit longer, but you are looking for a firm biscuit when you push down on it.
Let cool. Then devour. One biscuit and whatever is underneath it is great for a serving size. It holds up nicely when wrapped in tin foil and stored in the refrigerator for a few days. To reheat, place in microwave for a minute.

The most important thing to remember is to push down the biscuits! The texture of the biscuit will then resemble a traditional dumplin, while the top will have that flaky golden texture of a normal biscuit. Thus, I'm not sure whether to call this Chicken n Biscuits or Chicken n Dumplins. How about just Chicken n Amazingness?

Sunday, January 29, 2012

Step Two

Came to believe that the power of chocolate could restore me to baking sanity.

As I said in my last post, I've been baking a lot lately. This is sort of a catch up post, because if you can't tell already, I'm kind of bad at consistently posting. Maybe one day I will write a post with only one recipe. I'm trying not to make expectations though, because those only lead to resentments. So this post is going to contain two different types of brownies and cupcakes! YAY!
So lets start with Brownie #1
ONE BOWL brownies
I got this recipe from www.allrecipes.com

What You'll Need:
  • 4 (1 ounce) squares unsweetened chocolate
  • 3/4 cup butter
  • 2 cups white sugar
  • 3 eggs
  • 1 teaspoon vanilla extract
  • 1 cup all-purpose flour
  • 1 cup chopped walnuts
What You'll do:

  1. Preheat oven to 350 degrees F (180 degrees C).
  2. Microwave chocolate and butter or margarine in large bowl at HIGH for 2 minutes or until butter or margarine is melted.
  3. Stir until chocolate is melted. Stir in sugar. Mix in eggs and vanilla. Stir in flour and nuts.
  4. Spread in greased 13 x 9 inch pan. Bake for 35 minutes (do not overbake). 
Personally, I hate chopping up chocolate. WITH A PASSION. When I'm cooking with other people, I always delegate that task out. So since I was alone, I saw a tip on the recipe comments to use 12 tbsp of unsweetened cocoa powder and 3 tbsp vegetable oil. I just put these in the bowl with the butter and then put it in the microwave all together. These brownies came out really thick, chewy and fudgy. If you prefer cake like brownies, this is not the recipe for you!


Brownies #2: CARAMEL!


I cheated. I used a box recipe. However, I did splurge for the Ghiradelli Brownie mix. And they are good! I got this idea from www.recipegirl.com to put chocolate covered caramels in the brownie mix. Awesome idea. The chocolate covering melted into the brownie and the caramels became little pockets of joy. And, since it was a box mix, it was incredibly simple.


What you'll need:
1 box brownie mix of your choosing
Whatever the recipe for the brownie mix calls for
1 bag chocolate covered caramels (I used dove)


What You'll do:
Prepare Brownie mix as directed on box
Pour half of the batter into a prepared brownie pan
Place caramels on top of brownie mix
Pour other half of batter on top of caramels
Bake as directed on the brownie mix box


And Voilà! So easy and simple, and people are sure to think these are homemade.


And finally.... The Cookies n Creme Cupcake


OMG. Not enough can be said about this cupcake. Favorite thing I have made yet. And I encourage you to make the icing yourself, it is sooooo worth it!

So here's a picture of the cupcakes BEFORE icing.


Yes, believe your eyes. There are chunks of Oreo cookies inside the cupcake. I cannot describe with words how awesome this made the cupcake, you just have to try it for your self. This recipe is from www.bakerella.com


What you'll need:


Cupcakes:
1 1/2 cups all purpose flour
1/2 cup natural unsweetened cocoa
1 1/4 cup sugar
3/4 teaspoon baking soda
1/2 teaspoon baking powder
1/2 teaspoon salt
2 eggs
1/2 cup vegetable oil
1 teaspoon vanilla
3/4 cup milk
3/4 cup hot water
24 Oreos, plus more for crumbs
Frosting:
1 cup shortening
1 lb. powdered sugar
1 teaspoon vanilla
3-6 Tablespoons milk
2 or more teaspoons Oreo cookie crumbs

What You'll do:

For the cupcakes:
  • Preheat oven to 350 degrees.
  • Line tray with 12 baking cups.
  • Place one whole cookie in each cup or break apart at least 12 cookies and place the broken pieces into each cup.
  • Mix the flour, cocoa, sugar, baking soda, baking powder and salt in a large mixing bowl using a wire whisk.
  • Add the eggs, oil, vanilla and milk and mix well until thoroughly combined. Add the hot water and mix until combined.
  • Transfer the batter (it will be very liquid) to a large measuring cup and then pour batter into each baking cup so it’s about three quarters full. You should have a little left over.
  • Bake for 16-18 minutes.
Makes at least 12 cupcakes
For the frosting:
  • Beat the shortening in a mixer until smooth.
  • Add vanilla and mix until combined.
  • Add the powdered sugar in three additions, scraping down the sides after each addition.
  • Add a Tablespoon of milk at a time and mix together until you achieve the consistency you like.
  • Add the cookie crumbs and mix until completely combined. You can add more if you like, but I just wanted a light speckling to show off the white frosting.
  • Place frosting in a decorator bag with a 1M tip and swirl on top of each cupcake.
  • Insert a cookie on top of each cupcake.
  • You can also apply frosting on each cupcake in a mounded shape. Turn upside down and roll the top around in a small bowl of cookie crumbs to coat.
Have fun with these. They turn out beautiful!


Happy Baking!


Cookies of the week 4 and 5

So I have been baking a lot recently. The reason for this is I have felt that good ole defect of Anger coming back into my life in a huge way. Baking gives me time to think, time to myself, time to return to sanity. Here are the cookies that I have made for weeks 4 and 5 of 2012. And man are these the best yet.

Week 4: Oatmeal Chocolate Chip Cookies


I made 3 batches of these throughout the week because they were gone in an average of 2.5 hours. Yeah, they were that good. Extremely easy too. The recipe says the cinnamon is optional, but I highly recommend it. It's what sets these apart from your average cookie. I got this recipe from buddingbaketress.blogspot.com

What You'll Need:
1/2 cup (1 stick) + 6 tablespoons butter, softened
1/2 cup granulated sugar
3/4 cup firmly packed brown sugar
2 eggs
1 teaspoon vanilla
1 1/2 cups all-purpose flour
1 teaspoon baking soda
1/2 teaspoon salt
1 1/2 teaspoons cinnamon, optional
3 cups rolled oats
1 cup chocolate chips

What You'll do:

Preheat oven to 350°F. Lightly grease two cookie sheets and set aside.

Beat butter, sugar, and brown sugar together on medium speed until smooth and creamy. Add eggs and vanilla and mix until well combined. 

In a separate bowl, mix together the flour, baking soda, salt, and cinnamon, then add to the butter mixture and beat until combined. Stir in oats and chocolate chips. 

Scoop dough into rounded tablespoons and place on baking sheets about 2 inches apart. Lightly press down to flatten each dough ball. Bake for 9-11 minutes, or until done. I baked them for 10 minutes and they were a perfect chewy consistency. Cool 1 minute on cookie sheets; remove to wire rack and allow to cool completely.

Makes about 3 dozen cookies. 

Believe me, you need to make these cookies. You will be everyone's hero for a few days.

Week 5: Peppermint Patty Cookies

I really don't have much to say about these, because they were gone LIKE LIGHTNING! I seriously only had possession of these treats for a few hours. I guess that's what you get when you bring sweets to a room filled with addicts and alcoholics. I got this recipe from www.hersheys.com, so you know it's gonna be some legit chocolate-y ness.
What You'll Need:

24 to 26 small (1-1/2 inch) YORK Peppermint Patties  
2/3 cup butter or margarine, softened 
1 cup sugar
1 egg
1 tablespoon milk
1/2 teaspoon vanilla extract
1-1/2 cups all-purpose flour
1/3 cup HERSHEY'S Cocoa
1/2 teaspoon baking soda
1/4 teaspoon salt
 Green decorator's sugar


What You'll do:

  1. Beat butter and sugar in large mixing bowl; add egg, milk and vanilla, blending thoroughly. Stir together flour, cocoa, baking soda and salt. Add to butter mixture, blending well. Refrigerate dough about 1 hour or until firm enough to handle. (Dough will be a little soft.)
  2. Heat oven to 350°F. Lightly grease cookie sheet or line with parchment paper. Remove wrappers from peppermint patties.
  3. Roll dough into 1-1/4 inch balls. For each cookie flatten ball slightly; press peppermint pattie into dough. Mold dough around pattie so that it is completely covered. Place on prepared cookie sheet. Using knife edge press star design into surface of each cookie; sprinkle with decorator's sugar.
  4. Bake 12 to 14 minutes or until cookie is set; sprinkle with additional sugar, if desired. Cool slightly; remove from cookie sheet to wire rack. Cool completely. About 2 dozen cookies.
When the recipe says the dough will be soft, it is not kidding. This is a messy recipe. I suggest washing your hands off every 3 to 4 cookies. I used Green sugar on top to recall the yummy Thin Mint (and because the grocery store didn't have white), but you can use whatever color you would like.

Happy Baking!


Saturday, January 14, 2012

Cookie of the week!

When I was younger, my dad used to sing "If moon was cookie" from Sesame Street to me when he put me to bed. When the cookie monster took a bite out of the moon, My dad would mimic a mouth with his hands and "bite" in all of my ticklish spots. He called me his little cookie monster. He was right. I love cookies, but I want to do more than just get those pre-made chips ahoy or oreos. I wanted to bake.

So I'm starting a cookie of the week goal. Every week, I am going to make a different kind of cookie. There are 52 weeks in a year, so that means by the end of the year I will have made 52 different kinds of cookies, that is unless the Mayans were right, then it'd be 51. So we are now in the third week of of the year, and I have made 3 different types of cookies. Going along swimmingly!


Week 1: Chewy Gooey Flourless Chocolate Cookies
 These were awesome! They were a brownie like mixture and very chewy. I got this recipe from www.recipegirl.com (as usual)

You'll need:
  • 3 cups powdered sugar
  • 2/3 cup unsweetened Dutch-process cocoa powder
  • 1/4 teaspoon salt
  • 2 to 4 large egg whites, at room temperature
  • 1 Tablespoon pure vanilla extract
  • 1 1/2 cups bittersweet chocolate chips
What to do:

1. Preheat oven to 350 degrees F. Line two rimmed baking sheets with parchment paper (or silpat mats). If you use parchment paper, give it a light swoosh of nonstick spray.
2. In a large bowl, whisk together powdered sugar with cocoa powder and salt. Whisk in egg whites (start w/ just two) and vanilla extract and beat just until the batter is moistened. You're looking for a brownie-like, thick and fudgy batter consistency. If it seems too thick, add another egg white-- then a 4th one if it still seems too thick. Gently stir in chocolate chips.
3. Spoon batter onto the prepared baking sheets in 12 evenly spaced mounds per cookie sheet. I like to use a spring-release cookie scoop. Bake about 14 minutes, until the tops are glossy and lightly cracked. Slide the parchment paper (with the cookies) onto wire racks. Let cookies cool completely, and store in an airtight container for up to 3 days.

Tips:

*If you're baking this as a "gluten-free" recipe, just make sure that the brand of chocolate chips you are using is gluten free.
*Let the cookies cool completely before you attempt to remove them from the mat or the parchment. They're delicate, so gently peeling the paper away from the cookie works best.

It makes A LOT of cookies, as does all three of these recipes. but they are gooooooood.

Week 2: Chocolate-swirled Peanut Butter Cookies

Once again, I definitely patted myself on the back for these. SO AWESOME

I mean they just look epic, right? And really, who can complain with the peanut butter and chocolate combo. These were super easy and made a lot of cookies. Once again www.recipegirl.com is a genius!

You'll need:

  • 1 cup butter, at room temperature
  • 1 cup creamy peanut butter
  • 1 cup granulated white sugar
  • 1 cup light brown sugar, packed
  • 2 large eggs
  • 2 1/2 cups all-purpose flour
  • 1 1/2 teaspoons baking soda
  • 1 teaspoon baking powder
  • 1/2 teaspoon salt
  • 12 ounces semi-sweet chocolate chips
  • 14 ounce can sweetened condensed milk
  • 1 Tablespoon shortening
What to do:

1. In a large bowl with electric mixer, cream butter, peanut butter, sugars and eggs.
2. In a separate bowl, whisk together flour, baking soda, baking powder and salt. Mix in to wet mixture and blend together until combined.
3. Divide dough into 2 parts. Pat into balls, wrap with plastic wrap, and refrigerate until more firm (about an hour should be perfect).
4. Roll out 1 ball of dough into a large rectangle (about 11x15-inches... not too thin) on a thin floured towel. (Dough will be soft-ish, so roll gently).
5. In a medium bowl, melt chocolate chips with sweetened condensed milk and shortening in the microwave. Set for a minute, stir, then 30 seconds more, stir... continue until melted and smooth.
6. Spoon dollops of the chocolate mixture onto the rolled out dough (using about half of the chocolate), then spread carefully to cover most of the rectangle.
7. Using the towel as a guide, carefully lift the towel to help roll the rectangle into a log. Wrap the "log" in the paper towel and place into the freezer for about 20 minutes, or until the log has had a chance to firm up slightly. It's okay to leave it in the freezer longer than 20 minutes. It's easier to cut when firm.
8. While first batch is in the freezer, roll out the second ball of dough. If chocolate mixture has firmed up a bit, just stick it back in the microwave to melt again. Stir until smooth and spread remaining chocolate on the rolled out dough. Roll up into a log and freeze until ready to bake.
9. When ready to bake, preheat oven to 350°F. Line cookie sheets with parchment paper (or grease cookie sheets).
10. Remove firmed up cookie log from the freezer and cut into 1/4-inch slices.
11. Bake on prepared cookie sheets 13 to 15 minutes, or until cookies no longer look or feel gooey.

Tips:

*Do not use natural peanut butter for this recipe- you won't have good results.

I actually kept the second roll of dough in the freezer until the first batch of cookies had been depleted a little. It was 3 days later when I baked them, same time and temperature, and they turned out even better. Just dont forget to let them thaw a little before you start slicing.

Week 3: Snickerdoodles

Wowza. They turned out great. They actually just came out of the oven an hour ago. My house smells like sweet cinnamon sugar. It's great.
In the background is the other batch of chocolate-swirled peanut butter cookies. So basically I have over 75 freshly baked cookies in my house. Be jealous. This recipe once again came from www.recipegirl.com She just always has the best sweets. And I have a sweet tooth.

You'll need:
  • 1 cup shortening
  • 1 1/2 cups granulated white sugar
  • 2 large eggs
  • 2 3/4 cups all-purpose flour
  • 2 teaspoons cream of tartar
  • 1 teaspoon baking soda
  • 1/4 teaspoon salt
  • 3/4 cup granulated white sugar
  • 2 teaspoons ground cinnamon
What to do:
1. In a large bowl, use an electric mixer to beat together shortening, sugar and eggs.
2. In a separate bowl, sift dry ingredients together and stir into wet mixture. Chill dough in refrigerator until firm, at least 1 hour.
3. Preheat oven to 375 degrees F.
4. In a small bowl, mix the cinnamon/sugar. Use your hands to roll cookie dough into small balls (about 1 1/2 Tablespoons each). Roll balls in the cinnamon/sugar, and place on ungreased baking sheet- about 2 inches apart
5. Bake 8-10 minutes until cookies are flattened and look crinkly. Let cool on cookie sheets at least 5 minutes, then remove to a wire rack to cool completely.

Tips:

*For the rolling sugar: You'll have leftover sugar to throw away after rolling. I call for more than needed because I like to have a good puddle to roll them around in. Use less sugar if you don't want the waste.

And the cream of tartar sounds a little weird, but it makes a huge difference.

Thats it from me, happy baking!


Tuesday, January 3, 2012

The First Step

I am powerless over baking, and the amount of food in my kitchen at this time is unmanageable. So I decided to start a blog that is dedicated to baking. I know, not very original. Most of the recipes I find are on other food blogs, and I just make what appeals to me. If you are looking for something low fat or low carb, I am sorry to tell you this IS NOT the place for you. I just really started getting into this whole baking thing and since I started these are some examples of things I have made: Corn Dog Muffins, Chocolate Chip Cookie Dough Brownies, Oreo-stuffed Chocolate chip cookies, Pizza Muffins, Flourless Chocolate Cookies, 6-layer Rainbow Cake, Ham Egg and Cheese Muffins, Holiday Cornbread Stuffing, Green Bean Casserole, Country Fried Steak and plenty of other dishes. So, ya'll can see where this blog is headed, Soul Food and Sweets. What can I say, I was born and raised in the South!

First Recipe I will post will be the Corn Dog Muffins. Really really simple, and WAYYYYY delicious, especially for tailgating. I made these before going over to my mom's house to watch an Auburn football game. (Next season, just holding on for next season.) Well my step father wouldn't let anybody else hold the plate and he promptly ate about 3/4 of them.

So Its not a great picture, this is way back when before I perfected the art of taking pictures of food I make with my phone. But OH MAN are they good.

You'll Need:
  • 2 (8.5 ounce) packages corn bread mix (I prefer Jiffy, I like the sweetness of it)
  • 2 Tablespoons brown sugar (If you do use Jiffy, or a sweet cornbread, do not add this)
  • 2 large eggs
  • 1 1/2 cups milk
  • 9 whole hot dogs, diced
  • 1 cup grated cheddar cheese
  • ketchup, mustard, sour cream, honey mustard (for dipping)
1. Preheat oven to 400°F. Lightly grease mini muffin tins.
2. In a large bowl, stir together cornbread mix and brown sugar. In a small bowl whisk together eggs and milk, and then stir into dry mixture until moistened. Mix in hot dogs and cheese.
3. Spoon a good Tablespoonful into muffin tins, making sure you get some hot dog in each spoonful.
4. Bake 10 to 12 minutes, or until golden brown. Let cool for about 10-15 minutes in the pan before removing. For easy removal, cut around outsides of the muffins, then tip upside down onto a large cutting board & urge the muffins out using a knife to tap the bottoms of the muffin tins. They should slide right out.
5. Serve warm with desired dipping sauces.

I got this recipe from www.recipegirl.com  where, as you will see, I get most of my recipes.

Just so I don't get behind and cook more than I write, I'm also going to include the Chocolate Chip Cookie Dough Brownies, also from www.recipegirl.com. These were amazing. Like Crack. I'm in recovery, so I hang out with a bunch of addicts, and they told me I should sell these on the streets they are so good. Now that's saying something.

You will Need:
  • 4 ounces unsweetened chocolate, finely chopped
  • 1 cup butter, at room temperature
  • 2 cups light brown sugar, packed
  • 4 large eggs
  • 2 teaspoons vanilla extract
  • 1 cup all-purpose flour
  • 3/4 cup butter
  • 3/4 cup light brown sugar, packed
  • 3/4 cup granulated white sugar
  • 3 Tablespoons milk
  • 1 1/2 teaspoons vanilla extract
  • 1 1/2 cups all-purpose flour
  • 1 1/2 cups mini chocolate chips
  • 1/2 cup semisweet chips + 1 teaspoon shortening for drizzle, optional (I, obviously, did not drizzle. I couldn't keep myself from just digging in.)

    1. Prepare the brownies: Preheat oven to 325 degrees F. Spray a 9x13-inch pan with nonstick spray. In a medium glass bowl, melt chocolate in the microwave in short bursts of 30 seconds; stir after each burst and remove from microwave when melted and smooth. Set aside to cool slightly. In a large mixing bowl, mix butter and brown sugar with an electric mixer. Beat in eggs and vanilla extract. Mix in melted chocolate. Blend in flour and mix just until combined (don't over-mix). Spread batter into prepared pan. Bake 25 to 35 minutes. Watch closely and remove from oven when toothpick inserted into the center comes out clean. Let cool completely.
    2. Prepare the cookie dough: In a medium bowl, use an electric mixer to combine butter, brown sugar and white sugar. Mix in milk and vanilla. Mix in flour just until combined. Stir in chocolate chips.
    3. Spread cookie dough over the cooled brownies. Refrigerate until the dough is quite firm. It's okay to speed up the process and place it in the freezer too. The firmer the dough, the easier it will be to cut into neat squares. Use a sharp knife to cut the brownies. You may need to wipe the knife off with a paper towel in between cuts since the fudgy brownies and cookie dough will tend to stick to the knife a bit. These brownies are best to serve placed inside cupcake papers and served with a fork.
    4. If you'd like to add chocolate drizzle on top, melt 1/2 cup chocolate chips with 1 teaspoon of shortening in the microwave; stir until smooth. Scoop the melted chocolate into a zip baggie and snip off the corner. Squeeze the bag to drizzle the chocolate on top of each brownie. Sprinkle additional chocolate chips on top, if desired.

It was really, I mean REALLY, hard to let these sit in the refrigerator overnight. I definitely went the freezer route on this one. Oh, and I remember when I read this the first time I saw the brown sugar and I was like "yeah right! brown sugar in brownies?" LEAVE IT. You will be glad you did.