Why I bake- a lot

As an alcoholic in recovery, I had to find another outlet, another addiction if you will. I bake because it not only makes me happy to have created something, but it is always SO FULFILLING to give what I bake to other people, and make them happy. So none of the recipes on here include alcohol, and if I do make a recipe that calls for wine, I will substitute fruit juice.

And I am a big kid. I want to be a French teacher for pre-schoolers, so I feel it is important for me to keep thinking like a child. Also the whole child-like thinking helps me feel fulfilled in my daily life. Please leave comments if these recipes make you happy, I just love hearing that. I strive to keep the child inside me alive.

Wednesday, March 14, 2012

Cookie of the Week 11

I'M A BAKING LEPRECHAUN! lol not really. There is no pot of gold at the end of this post (DAGNABBIT) But for St. Patrick's day, I decided to go green with the cookie of the week! My friend Carrie made these cookies a while back, and they were so good I just had to add them to the cookie of the week list. AND THEY ARE GREEEEEEEEEEEN. Perfect.

Mint Chocolate Chip cookies. They actually taste like the ice cream, but not, you know, cold. It was a weird taste first bite and then reality sets in and you just want to keep eating them!

They look so pretty all packed up in the cookie jar that I just had to take a picture of them. This recipe comes from thestir.cafemom.com

You'll Need:
2 3/4 cups all-purpose flour
1 teaspoon baking soda
1/2 teaspoon baking powder
1 cup butter, softened
1 1/2 cups white sugar
1 egg
1 teaspoon vanilla extract
1/2 teaspoon mint extract
8-10 drops of green food coloring (optional)
1/2 cup creme de menthe baking chips 
1/2 cup semisweet chocolate chunks

You'll do:
Preheat oven to 375 degrees F.
Mix together flour, baking soda, and baking powder.
In a large bowl, cream together the butter and sugar until smooth.
Beat in egg, mint, food coloring, and vanilla. Gradually blend in the dry ingredients.
Add the baking chips and chocolate chunks. 
Roll dough into balls, and place onto ungreased cookie sheets.
Bake 8 to 10 minutes in the preheated oven, or until golden. Let cool.

Some tips from yours truly: My grocery store did not have creme de menthe chips, but they did have a dark chocolate/ mint chip mix from Toll House. I used a cup of these and just omitted the other chocolate chunks. Worked out fine. I did add slightly more food coloring than the recipe calls for, and that also turned out fine. I wanted them suckers GREEN. And finally, don't be led astray by the ungreased cookie sheet. I thought it was weird when I first read it, but there is soooo much butter that these things just lift right off the pan. I was planning on a cleaning struggle, but it did not come to that thankfully.

That's week 11!!!! Can you guys believe its the 11th week ALREADY? Its true, time does fly as you get older.

Happy Baking!

Monday, March 12, 2012

Cookie of the Week 10

Cinnamon bun COOKIES

Yum Yum Yum! Not the best I've made yet, but pretty damn good! I got behind on the cookie of the week deal this month because I first realized that I had miscounted weeks and had too many cookies vs. weeks AND THEN I was a part of a planning committee for a conference that was this past weekend, SO I was pretty engulfed in that all last week. So I made cookies tonight and I plan on making week 11 later this week. It will be festive for St. Patty's day! YAY! Is it weird that even as an active alcoholic I never really participated in St. Patrick's Day except for a few pinches, usually directed toward the male of the moment, as a way of flirting. Yah, I certainly have that whole male problem in my life too. ANYWHO, back to cookies! These are another roll up cookie, similar to the Chocolate-Swirled Peanut Butter Cookies of Week 2.
 The Icing makes them glorious looking. I got this recipe from Once upon a Plate.

You'll Need:
2 cups all-purpose flour, plus additional 2 tablespoons flour
1 teaspoon ground cinnamon, plus 1 tablespoon ground cinnamon (divided use)
1/2 teaspoon baking soday
1/2 cup butter, soft room temperature, plus 3 tablespoons (divided use)
1/2 teaspoon salt
1/4 cup granulated sugar
1/4 cup brown sugar, plus 1/2 cup (divided use)
1 egg yolk
1/4 u applesauce
1 tablespoon light corn syrup
1 teaspoon vanilla
For the glaze:
1/2 cup confectioner's sugar (sifted)
1 to 3 tablespoons milk

You'll do:
In a medium bowl thoroughly whisk flour, salt, baking soda and cinnamon until ingredients are evenly blended and no lumps are present.
In the bowl of a stand mixer fitted with paddle attachment,  beat 1/2 cup butter, 1/4 cup granulated sugar, 1/4 cup brown sugar until light colored. To the mixture add egg yolk, applesauce, corn syrup & vanilla. Beat until well incorporated.  Remove paddle and bowl from mixer. With a wooden spoon or stiff spatula fold flour mixture into butter mixture until just combined. Divide dough into two equal pieces, wrap in cling film; refrigerate for 30 minutes to an hour. While dough is chilling combine 1 tablespoon cinnamon & 1/2 cup brown sugar in a bowl; whisk to mix evenly. Set aside.
When dough has chilled, roll out into a rectangle 1/4-inch thick. The dough is sticky, so I like to either roll between two silpat/silicone baking mats, or waxed paper which has been sprayed with a little oil spray (like Pam). Place one oiled wax paper facing up, place the dough, then top with another sheet of wax paper (oil side down), then begin rolling. With a pastry brush, spread 1 1/2 tablespoons of soften butter on dough; sprinkle 1/2 of the cinnamon & sugar mixture evenly over the butter; gently pat into the dough.  Form log by rolling log from the long side, roll firmly and place seam side down on parchment paper or plastic cling film; wrap air-tight.  Repeat entire process with second half of dough. Place both wrapped logs in the refrigerator and chill for 45 minutes to an hour.
When chilled, remove from refrigerator and slice each log into 1/2 inch slices, place slices on parchment lined, or baking mat lined baking sheets, leaving about 1" between each slice on all sides.  Bake in a 350˚ (F) oven for about 8 to 10 minutes until lightly browned.  Remove from oven, allow to cool on baking sheet for 2 to 3 minutes, then place each cookie on a wire rack to cool.
Make Glaze:
Sift powdered sugar place in a small bowl;  drizzle in milk until desired glaze consistency is reached.  Drizzle tops of cookies with glaze. Glaze will dry completely, store cookies in an airtight container.

A few notes from my experience: I had no idea what the "u" was for the applesauce. I just used a whole one of those single serving applesauce cups. Be sure that when you roll your log, you roll tightly. This will #1 make it easier to cut the cookies and #2 they won't semi-fall apart in the oven.

The recipe on the blog says it makes two dozen two inch cookies. One batch of mine came out as one inch and I made about 20 cookies. As with all recipes, I guess it just varies.

Happy Baking! 

Tuesday, March 6, 2012

Happy 100th Birthday Oreo!

It's a birthday celebration of the most awesome little snack cookie EVER. If anyone wants to argue that point, go ahead, hit me with your best shot. Oreos are so awesome because you can eat them several different ways, like dunking, licking the creme first and just munching down on the cookie, or just eating it the regular way. AND because you can bake them into some pretty awesome things. Wrap chocolate chip cookie dough around them and bake them for an Oreo inside a cookie. Put them in cupcakes, smash them up into ice cream for cookies and creme ice cream, Use the crumbles to coat a cheesecake cookie for a wonderment for the mouth, or combine a bunch of stuff and make Cookies 'n' Cream Oreo Fudge Brownies, which is what I did to day to celebrate.

Let me say that again: COOKIES 'N' CREAM OREO FUDGE BROWNIES

Maybe a picture will help you salivate over this a little more:

Yep. I did gooooooood. These brownies are not only fudgy, melt in your mouth awesomeness, but they also have that great cream taste that can come from the one and only O-REEEEEEEEEE-O. yum yum yum yum. Got this recipe from www.kevinandamanda.com. So happy with these! If you want a prettier picture, go to their site. I had a little trouble getting the brownies out of the pan all nice and neat because they were THAT gooey.

You'll need:
1 box Brownie Mix
eggs & oil (as called for by the brownie mix)
1 heaping half cup (6 oz) Cookies & Cream ice cream
1/4 Cup hot fudge topping (chilled or room temp)

You'll do:
Preheat oven & spray an 8×8 baking dish generously with cooking spray. Combine brownie mix, eggs, and oil as directed on the back of the box, but do not add the water. Add ice cream and hot fudge to the brownie batter and stir to combine. Pour half of the brownie batter into the baking dish, layer with Oreos, then top with remaining batter. Bake for 40-50 minutes or as directed on the back of the box.

I actually put some crumbled Oreos on top, ya know, just for good measure. I will say once agian, these rock.

Happy Baking!

Monday, March 5, 2012

Step Three: Made a decision to turn my life over to the joy of baking. And Chess Squares!

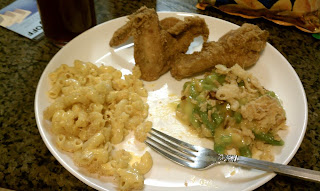
Seriously, I'm on a baking kick. It's Spring Break for me this week, so I decided tonight I was gonna make myself a nice southern meal. Fried chicken, Green Bean Casserole and Macaroni and Cheese.
Granted, I got some help along the way. Kroger Fried chicken and I made the Kraft homestyle Mac & Cheese. But I did make the Green Bean Casserole! (Or as my friend Ian likes to call it, Greenbough casserole) I make it a touch different than most people so here's the recipe for that:

You'll Need:
2 large cans of green beans, drained
2 cans of cream of cheddar soup
1 large can of fried onions

You'll do:
Preheat the oven to 325. Mix the DRAINED green beans, soup and half of the onions in a large mixing bowl. Transfer mixture to a prepared casserole dish, cover with other half of fried onions. Bake for about 20-25 minutes.

You can add salt and pepper to taste, or you can add milk, but I find if you use the cheddar cheese soup it turns out fine without anything extra. And yes, there is a story about why i mentioned draining the green beans twice. You see, this used to be the only thing I was comfortable with making for a long time, mainly because i was drunk and there is no expertise that goes into making this. So consequently, I made this drunk quite often. It is great hangover food. One time, however, I forgot to drain the beans. And it ended badly. Like a car wreck. To tell you the truth, it didn't just happen once, because usually I got into my cooking mode during blackouts (I know, I know, not the safest thing to do). So it was often that I opened the refrigerator the next morning to a soggy mess. What a waste of fried onions and soup. My advice is this: DON'T FORGET TO DRAIN THE BEANS!!!!

So now onto more important stuff, like dessert.

In keeping with my southern meal theme, I was craving a chess pie. If you have never had chess pie, it is basically eggs, butter, and sugar. Nothing wrong there. I highly recommend it. The problem with making a chess pie though is that it is hard to get the consistency right. I've tried multiple times and have ended up with a pie that was perfect until you got to about 2 inches from the center, and it wasn't baked at all. So for my dessert tonight, I decided to make chess squares. They are basically the same idea as chess pie, just baked more like a cake and pumped up a little bit. I have heard these things referred to as chess pie on steroids, and I must say, this is pretty accurate. Melt in your mouth goodness right here. I found this recipe on http://girloutofdixie.wordpress.com and I must say, I absolutely adore this blog. I love how I can relate to EVERYTHING on there. My favorite post is the one about pigs in a blanket, and the make-believe argument about how many crescent rolls to buy in the grocery store. I'm proud to say I have had that exact same argument. I take the stance that you can never have too many cans of crescent rolls lying around. They are so damn versatile. My favorite thing is wrapping sloppy joe mix and ground beef inside them and covering them with cheddar cheese before you bake them. Add 1-2 minutes on the bake time if you fill them. But alas, I digress. We are talking about chess squares. So this is what you get coming out of the oven:


It is just so beautiful that I had to take a picture. And it smells amazing. And the smell lingers. There is just so many wins to making this its unbelievable. And for my favorite food picture I have taken yet:


BEAUTIFUL, RIGHT? I know, I'm a baking rockstar. I'm kinda a big deal. So everyone that usually eats the stuff I bake that tried these agreed that this was my best creation yet. I know, ya'll are getting tired of reading it, but these are the best things yet. YUMMY YUMMY GET IN MY TUMMY!

You'll need:

For the crust:
1 egg
1 box yellow cake mix
1 t vanilla
1 stick butter, melted and cooled

For the filling:
8 oz. Cream cheese
3 eggs
1 box confectioner’s sugar

You'll do:

For the crust:
Mix above until crumbly. Spread in a buttered (or Crisco-ed, if you must) 9 x 13” pan. Work from the center and have the crust a little higher around the edges.

For the filling:
Beat well and pour into crust. Bake at 375 for 30 to 40 minutes or until brown.

I'm gonna have to make another batch of these soon. Happy baking ya'll!!!